How to Synchronize the Clock in Windows 10 with Internet or Atomic Time

Are you a stickler for keeping accurate time? Learn how to sync your computer with Internet and atomic time.
The clock on your Windows PC doesn’t just tell you the time. Windows uses the clock to record when you create or modify files.
Typically, the Windows clock synchronizes with internet time once a week if connected to the internet. You can also manually force the clock to synchronize with internet time whenever you want.
Today we’ll show you how to sync your PC’s clock with internet time in Windows’ settings and using the command line. We’ll also show you a couple of third-party tools that help you automate syncing your clock with internet or atomic time.
Synchronize the Clock with an Internet Time Server in Internet Time Settings
The easiest way to synchronize your clock is to use Windows 10’s settings.
Open the Start menu and click Settings.
Then, click Time & Language on the Settings dialog box.
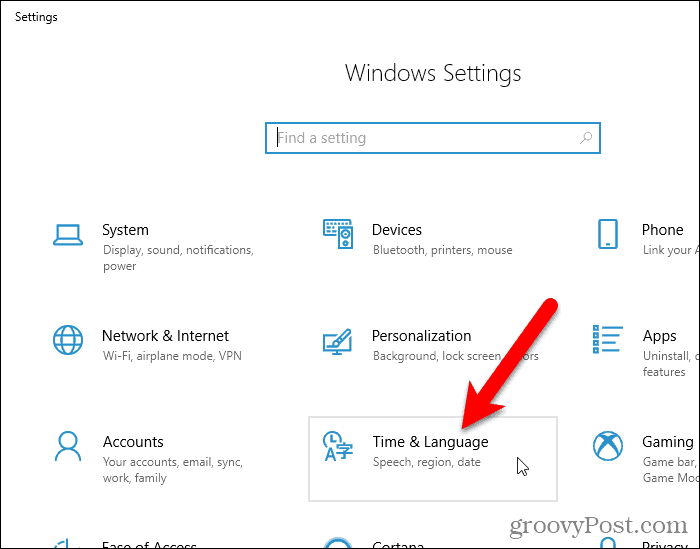

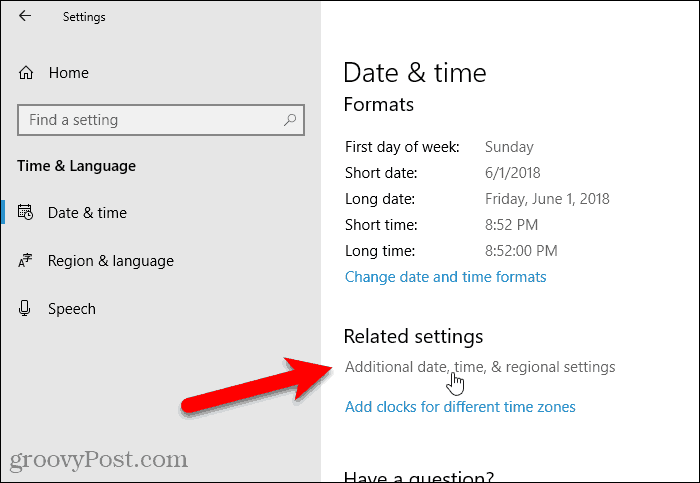
Scroll down to the Related settings section and click Additional date, time, & regional settings.

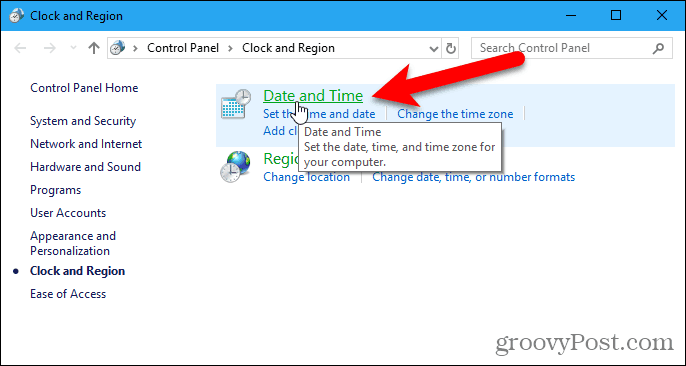
The Clock and Region screen in the Control Panel displays. Click Date and Time.

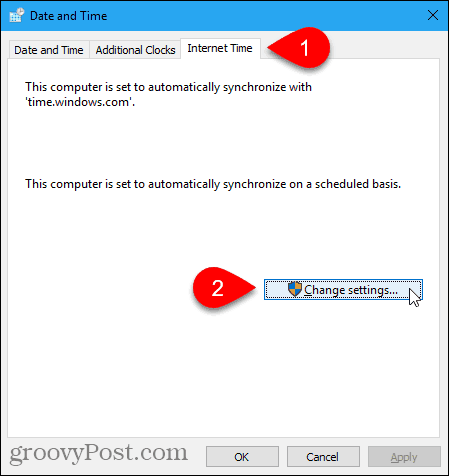
Click the Internet Time tab on the Date and Time dialog box. Then, click Change settings.

On the Internet Time Settings dialog box, check the Synchronize with an Internet time server box.
Then, select a Server from the drop-down list. If you don’t see a server you want to use, you can type the name of an Internet time server. You can find links to lists of time servers on Microsoft’s site.
Click Update now.
If you get an error, keep trying to sync. You may have to select a different server, sync, and select the server you want, and try syncing again.
A message displays on the Internet Time Settings dialog box when the clock is successfully synced.
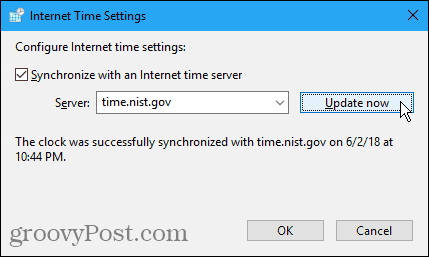

If your PC’s time or date is off by too much, you may get an error when trying to sync. If that’s the case, you can go back to the Date and Time dialog box, click the Date and Time tab, and set the time and date to close to the current time and date. Then, click Change settings on the Internet Time tab and try syncing the clock again on the Internet Time Settings dialog box.
Synchronize Clock with an Internet Time Server Using the Command Line
If you prefer using the command line, you can use the Command Prompt to synchronize your PC’s clock to Internet time.
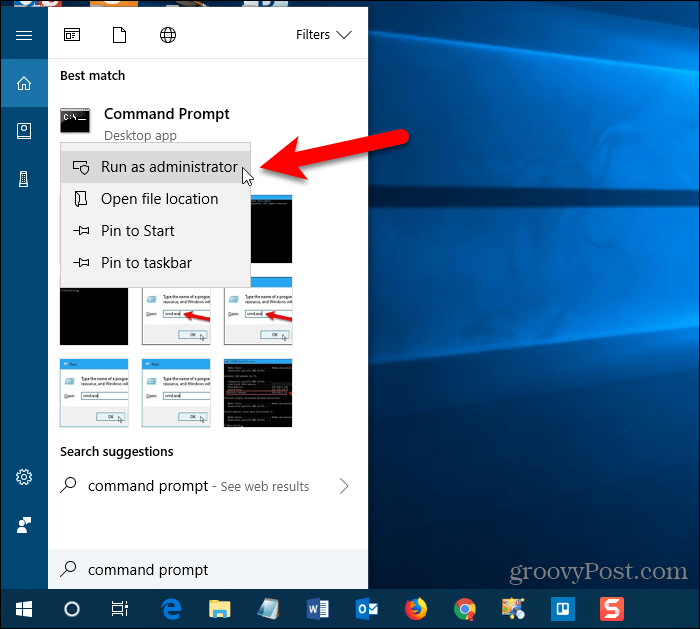
It would be best if you opened the Command Prompt as administrator. So search for “command prompt” using Cortana or Search next to the Start menu.
Right-click on Command Prompt under Best match and select Run as administrator.
If the User Account Control dialog box displays, click Yes to give permission and continue.

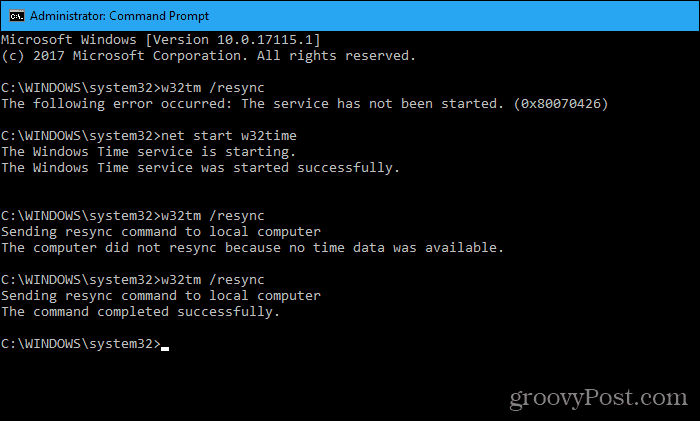
Type the following command at the prompt and press Enter.
w32tm /resync
You may see an error saying the service has not been started. To correct this error, run the following command.
net start w32time
Then, rerun the previous command to try to sync the clock. At this point, you might see an error saying the computer did not resync because no time data was available. Keep trying the “w32tm /resync” command until you see that the command completed successfully.
To get help about using the command or to read about additional options you can use with the command, run the following command.
w32tm /?

Third-Party Tools That Automatically Sync Your PC’s Clock with the Internet or Atomic Time
Here are a couple of third-party tools that provide additional options and allow you to automatically sync your PC’s clock with internet time or atomic time.
Dimension 4
Dimension 4 is a popular time correction program for Windows that’s free for personal use. The program comes with a large list of time servers to choose from. You can also have Dimension 4 load at Windows startup, sync your PC’s clock once, and then automatically exit the program.
Once you’ve downloaded and installed Dimension 4, open the Start menu and run the program. You won’t see an icon on the desktop for Dimension 4.
You might see the User Account Control dialog box several times while setting up Dimension 4. Click Yes when prompted each time to allow the program to configure itself.
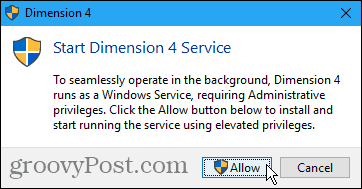
You must stop the Windows Time Service so Dimension 4 can run its own service. Click Allow on the following dialog box.


Click Allow again to start the Dimension 4 service.

On the main Dimension 4 dialog box, click Settings.


We’re going to set up Dimension 4 to load when Windows starts up, sync the clock, and then exit the program.
At the top of the dialog box is a list of servers you can choose from.
In the How Often section, check the Load Dimension 4 at startup and Once loaded, wait until online boxes. Then, select Synchronize once, then exit.
Uncheck the Maximum correction box in the Correction section. If you don’t uncheck this box, this won’t work. This setting only updates the time if the time on the computer is within the specified time range.
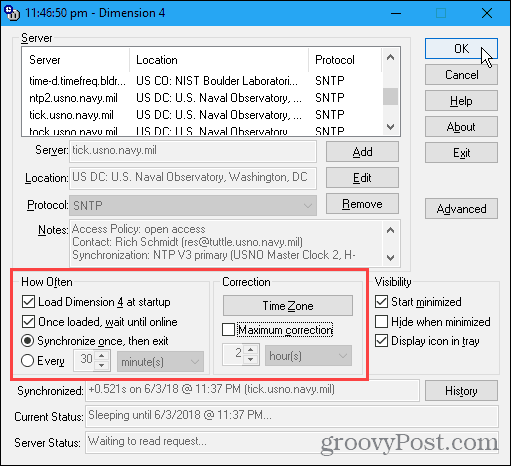

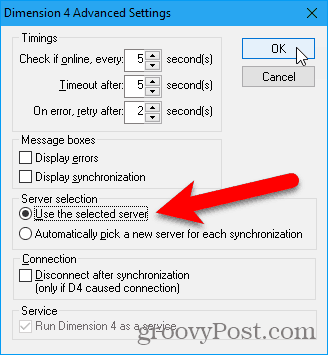
By default, Dimension 4 automatically uses a different server every time it syncs. If you’ve selected a specific server, and you want to use that same server every time, click Advanced on the right side of the main Dimensions 4 window.
In the Server selection section on the Advanced Settings dialog box, select Use the selected server. Change any other settings you want to adjust and click OK.

Now, every time you start Windows, your PC’s clock will sync with the server you selected or the one Dimension 4 selects each time it syncs.
Atomic Clock Sync
Atomic clocks are considered the most precise clocks. The free tool, Atomic Clock Sync, offers an easy way to sync your PC’s clock with atomic time at a regular interval.
This program allows you to automatically sync your PC’s time with the atomic time servers maintained by the National Institute of Standards and Technology (NIST) in the United States. These servers are considered the most accurate and correct atomic time servers.
Download Atomic Clock Sync and double-click the .exe file to run the program. No installation is needed.
If the User Account Control dialog box displays, click Yes to give permission and continue.
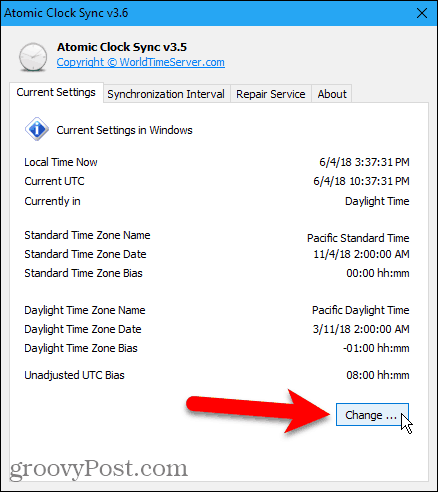
The Current Settings tab shows the current date and time settings in Windows. For the time synchronization to work properly, you must have the correct time zone selected on your computer and have the correct Daylight Savings Time rules set.
If you need to adjust the date and time settings, click Change on the Current Settings tab.

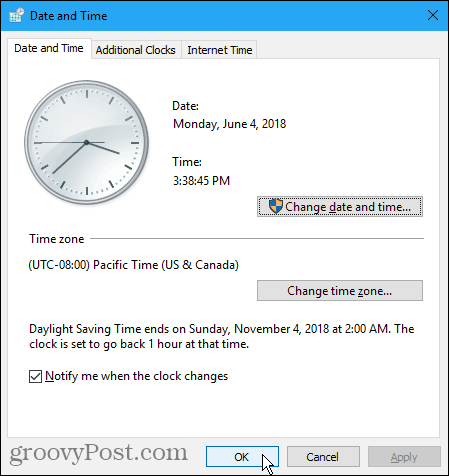
Use the Date and Time dialog box to Change date and time or Change time zone, as necessary.

To specify how often your PC’s clock synchronizes, click the Synchronization Interval tab.
The default interval is 604,800 seconds, which is one week. Use the drop-down list to choose the type of interval (seconds, minutes, hours, or days). Enter a number for that interval in the box to the left of the drop-down list. Then, click Apply.
For example, we changed the interval to one day.
You can also manually sync the clock by clicking Sync Now.


If you’re having problems syncing your clock, click the Repair Service tab and go through the numbered button steps to fix the problem.
The program also provides a link to a step-by-step troubleshooting guide in case you’re still having problems.


Have Your Computer Keep Accurate Time
Do you have clocks that sync to atomic time around your house? What about a watch that syncs to atomic time or a smartwatch? Now you can include your computer in your collections of devices that keep accurate time.
