How to Loop a Powerpoint Presentation

Need to create a hands-free PowerPoint presentation that’ll loop continuously? Here’s how.
When you’re trying to create an engaging presentation, you don’t want to be bogged down by your PowerPoint. It should flow seamlessly alongside you, with effective slide transitions timed to match.
Timings don’t necessarily work if you’re not involved in your PowerPoint presentation, however. If you’re using it to display images or video in a shop display, for instance, you’d want your PowerPoint slides to loop continuously.
If you want to loop a PowerPoint presentation, here’s what you’ll need to do.
How to Loop PowerPoint Slides
To create a never-ending PowerPoint presentation, you’ll first need a presentation with multiple slides. Open this up in PowerPoint to begin, then head to the Slide Show tab on the ribbon bar.
From there, click Set Up Slide Show to begin modifying your PowerPoint timings.


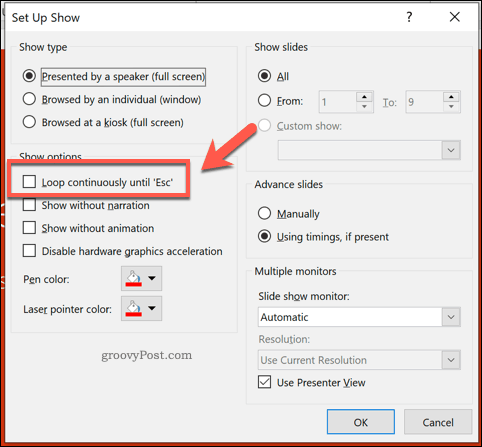
This will open the Set Up Show window, where you can modify your PowerPoint settings, including the presentation type and whether the slides continue automatically or not.
Under the Show Options group, click to enable the checkbox next to the Loop Continuously until Esc option, then press OK to save.


This setting will ensure that your PowerPoint presentation will only stop when the Esc key on your keyboard is pressed. After the final slide is reached, it’ll loop back to the first slide and start over.
The only problem with this setting is that it still requires user input. The presentation will loop back to the start, but it won’t advance each slide automatically—you’ll need to set slide transition timings next to have a truly hands-free PowerPoint presentation.
Setting PowerPoint Slide Transition Timings
Rather than clicking your mouse for each new slide, you can set your PowerPoint slides to proceed automatically. This means your slides are timed, and won’t require any user interaction at all once the presentation is active.
To do this, you’ll need to return to press Slide Show > Set Up Slide Show on the ribbon bar. In the Set Up Show window, click Using timings, if present under the Advance slides section.


Click OK to save and close the window. You’ll now need to set timings for your slides—click the Transitions tab on the ribbon bar to do this.


Under the Timing section of the Transitions tab, you’ll be able to set the length of time your slides will be shown before the next slide appears.
Click to enable the After checkbox, then set a time in the option box next to it. Disregard the On Mouse Click checkbox, as your Set Up Show settings will override this, but feel free to uncheck the option if you’d prefer.


This setting will only apply to your currently selected slide. You can set individual timings for each slide, or press the Apply to All button. This will apply the same timing to each of your slides.


You can now test your PowerPoint presentation by clicking Slide Show > From Beginning on the ribbon bar, or by pressing the F5 key on your keyboard.


If the settings you applied were correct, your PowerPoint presentation will begin from the start, and each slide will be shown for a set time. When the presentation ends, it’ll loop back to the beginning with no user input.
You can end the presentation as normal by pressing the Esc key on your keyboard.
Using PowerPoint Show Types
Even when your PowerPoint presentation is set to loop automatically, you can still skip a slide by pressing it, as well as view the controls.
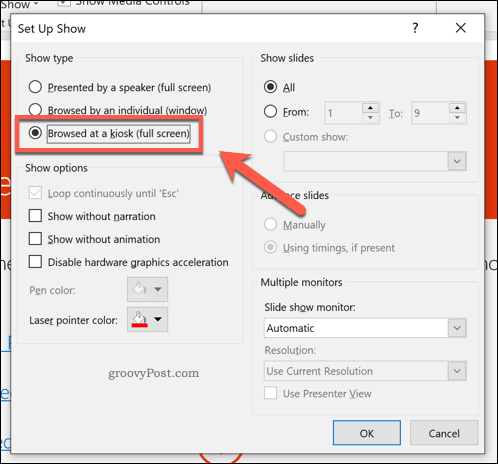
To become a true hands-free kiosk display, you’ll need to change the show type. This will stop users from skipping slides or viewing the slide controls. To do this, press Slide Show > Set Up Slide Show on the ribbon bar.
In the Set Up Show window, you’ll see three available show types under the Show types section. To switch to kiosk mode, press the Browsed at a kiosk (full screen) option.


Click OK to save once you’re done, then launch your presentation by pressing Slide Show > From Beginning or by hitting the F5 key.
Once enabled, you’ll no longer be able to view any PowerPoint controls or skip a slide, but you can still press the Esc key to end the presentation.
Creating Hands-Free PowerPoint Presentations
PowerPoint has proven itself to be the go-to tool for many users looking to create hands-free presentations, but it’s capable of so much more.
You can insert Excel data into PowerPoint to create data-rich presentations or, if you’re looking for something more visual, you can add video to a PowerPoint instead.
