Mac Not Getting IP Address With DHCP: 7 Fixes

Are you connected to your local network but your Mac isn’t getting an IP address with DHCP enabled? Use the steps in this guide to troubleshoot the problem.
In order for your computer or mobile device to be able to access the internet, it needs to have a local IP address. This is the address that your router uses to send data to your device. Usually, the IP address is assigned by your router automatically—you don’t have to worry about what it is.
Sometimes, however, you may not be able to connect to the internet. When you take a look at your network, you’ll see an error message stating that your computer has a self-assigned IP address. This means that because your computer has not been given an IP address by your router, it’s had to make one up of its own. Since your router doesn’t know what this IP address is, you won’t be able to connect to the internet.
Thankfully, there are a few ways to fix this issue and get your internet connection back up and running. Here are some fixes to try if you’re having problems with your Mac not getting an IP address with DHCP enabled.
1. Restart Your Router
If you’re using DHCP to assign IP addresses to devices on your network, then it’s your router that’s doing the assigning. If you’re seeing a self-assigned IP address error, then the issue may be with your router.
First, try power cycling your router. Power it off, leave it off for 30 seconds or so, then power it back up again. Once it’s back up and running, check your local network is active and you have a stable internet connection again to see if the problem is fixed. If it isn’t, try following your router’s instructions to access the router settings and ensure that DHCP is enabled.
2. Renew Your DHCP Lease
When your router assigns IP addresses to devices on your network, it doesn’t give your devices those IP addresses forever. This is for a good reason—if someone comes to visit and connects to your Wi-Fi, their device gets assigned an IP address. If that IP address was permanent, none of the other devices on your network would ever be able to use it, even if that device never appeared on your network again.
To get around this, your router issues a DHCP lease. This is a limited time for which the device gets to keep the assigned IP address. Halfway through the lease time, the device will try to renew the lease. If it can’t contact the router at all during the remaining time, the lease expires, and the IP address is freed up for any other device to use.
It’s possible to manually try to renew a DHCP lease on your Mac to see if this fixes the issue.
To manually renew a DHCP lease on Mac:
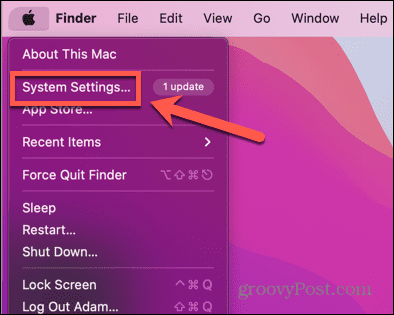
- Click the Apple icon in the menu bar.


- Select System Settings.


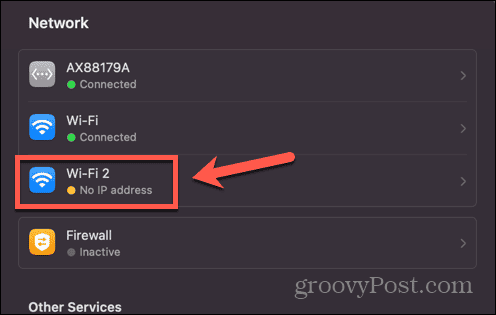
- In the left-hand menu, click Network.


- Select the Ethernet or Wi-Fi network.


- Click Details.


- In the left-hand menu, select TCP/IP.


- Click the Renew DCHP Lease button.


3. Set the Service Order
You may also be able to fix your DHCP problems by changing the order that your Mac tries to connect to different networks. It may be that your Mac is trying to connect to the wrong network first and this is causing your problems.
To set the network service order on Mac:
- Click the Apple icon.


- Select System Settings.


- Select Network from the left-hand menu.


- At the bottom of the Network page, click the Three Dots button.


- Select Set Service Order.


- Drag the service that you want to use to the top of the list, and any services you don’t intend to use to the bottom.


- Click OK and try your network connection again.
4. Add a New Network Location
If the problem is with your current network location, creating a new one may be able to solve the problem. Try creating a new network location and connecting to this new network instead.
To add a new network location on Mac:
- Click the Apple logo in the top-left of the screen.


- Select System Settings.


- Click Network.


- At the bottom of the page, click the Three Dots button.


- Select Add Service.


- Choose an Interface from the drop-down and give the service a name.


- Click Create.


- Select your newly created service.


- Click the Details button.


- Select TCP/IP from the left-hand menu.


- Click the Renew DHCP Lease button.


- Try your new network connection to see if it works.
5. Reset the Mac Firewall
Your firewall is intended to protect you from unwanted connections to your Mac, but it can also cause issues with your network connection. You can try resetting your firewall to see if this solves the problem.
To reset your firewall on Mac:
- Open Finder.
- In the menu bar, click Go.


- Select Go to Folder.


- Type /Library/Preferences and press Enter.


- Find the apple.alf.plist file, right-click the file, and select Move to Trash.


- Restart your Mac and try your network connection again.
6. Reset Network Preferences
You can also try resetting your network preferences on your Mac to see if this fixes the self-assigned IP address issue. This involves deleting the preferences files and rebooting, which gets your Mac to recreate them with default settings.
To reset network preferences on Mac:
- Launch Finder and click Go in the menu bar.


- Select Go to Folder.


- Type /Library/Preferences/SystemConfiguration and press Enter.
- Select the files apple.airport.preferences.plist, NetworkInterfaces.plist, and preferences.plist.


- Right-click and select Move to Trash.


- Restart your Mac and try your network connection again.
7. Try a Different DNS Server
A DNS server is a server that translates the web address that you type into the URL bar of your browser into an IP address that can be located on the internet. Using a different DNS server may be able to fix your problem with your Mac not getting an IP address.
To use a different DNS server on Mac:
- Click the Apple icon.


- Select System Settings.


- Select Network.


- Click the network that is causing your problems.
- Click the Details button.


- In the left-hand menu, select DNS.


- Click + (plus).


- Add some additional DNS servers, such as 8.8.8.8 (Google) 9.9.9.9 (Quad9), and 1.1.1.1 (Cloudflare).
- Click OK and try your network connection again.
Fix Common Mac Problems
Hopefully one of the fixes above has solved your problems with your Mac not getting an IP address with DHCP. If you find any other useful fixes, please let us know in the comments below.
If you’re having Mac problems, you’re probably not the first to have experienced them. There are some possible fixes for common Mac issues. For example, if your Mac delete key isn’t working, there are some fixes you can try. If you’re having problems with your Mac headphones not working, there are a few things you can try that may help. And there are a range of fixes for the most common Mac problems that may get you back up and running again.
Leave a Reply
Leave a Reply
