Migrate Microsoft Virtual Server 2005 R2 VM to Windows Server 2008 Hyper-V
Recently I converted/imported a Windows Vista Enterprise SP1 Virtual Machine from my Microsoft Virtual Server 2005 R2 SP1 environment to my new Microsoft Windows Server 2008 box running the new Hyper-V Virtual Server technology. The upgrade was a bit easier than I expected BUT I did run into a few surprises along the way. If you stick closely to the below How-To, the information should enable you to easily convert any previous Windows Server or Virtual PC VM that uses the .VHD hard drive format.
For example, below I’ll be converting a Windows Vista Enterprise SP1 VM from my Microsoft Virtual Server 2005 R2 SP1 box to my new Server 2008 Hyper-V box.
Although the screen shots are all taken from a Vista Migration, if you pay close attention, I will also be documenting what you can expect from a Windows Server 2003 Migration. Read carefully; it’s a bit messy…. sorry about that….
Steps to take BEFORE you begin the import/migration process:
- GUEST SYSTEM
- Upgrade Virtual Guest Systems to latest Service Pack (Vista – SP1, XP – SP3, Windows Server 2003 SP2, etc.)
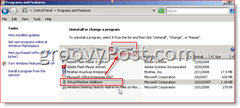
- Uninstall Virtual Machine Additions (not required but it saves time later)
- Copy the .VHD file(s) to your new Windows 2008 Virtual Server / Hyper-V (In the example below, I created a folder under d:\vm\servername on my Hyper-V box)
- VM HOST
- Install Windows Server 2008 Update – http://support.microsoft.com/kb/949219. This MUST should be done before you begin building new VM’s on Hyper-V or convert/migrate/import existing VM’s to Hyper-V.
With that said, let’s jump right into it: Migrate Vista Enterprise SP1 VM to Hyper-V / Server 2008
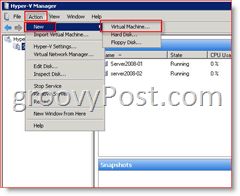
1: Open Hyper-V Manager and Create a new Virtual Machine by Clicking Action, New, Virtual Machine:
Note: Don’t get confused by the Import Virtual Machine… as this can only be used to import an existing Hyper-V Virtual Machine.
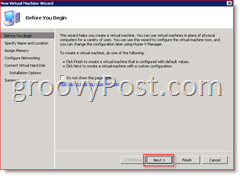
2: Click Next:
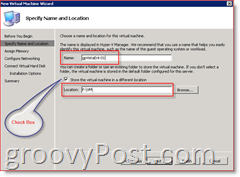
3: Type in the new Name of the VM then Click Next:
If desired, Check the box “Store the virtual machine in a different location” and then Browse to that location or Type it into the Location Box as shown below. Typically this will be the location you stored the .VHD file you are migrating.
Note: By following the below example, the Hyper-V Wizard will create a sub-folder automatically using the VM Name entered – In other words, a folder will now be created called: “f:\vm\gpVistaEnt-01”
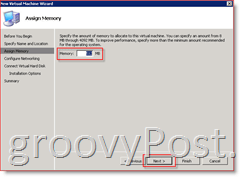
4: Specify Amount of Memory to assign VM and Click Next
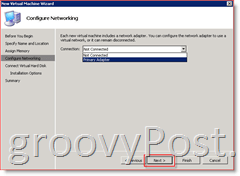
5: (Optional) Assign a Network Adapter to the VM and Click Next
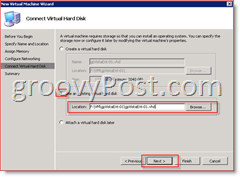
6: Select Use an existing virtual hard disk bullet and Type or Browse to your legacy .vhd file then Click Next
7: Click Finish on the next screen after you verify everything looks good.
Note: All steps below should be completed while logged into the local Windows Server so you can fully control the new Guest VM’s. If you’re connected to the console via Remote Desktop (RDP 3389) on the host, you will get the following error message when trying to connect to the mouse:


This error will go away once you complete this How-To and the new VM has the latest VM Additions installed.
8: Start the new Guest VM from the Hyper-V Virtual Manager and log in to the Virtual Manager Console.
After login, your new VM is going to begin installing new hardware. You can watch the progress by double clicking on the Software Install Icon on the toolbar.
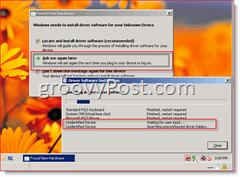
9: When/if prompted to install an Unknown Device, Click Ask me again later
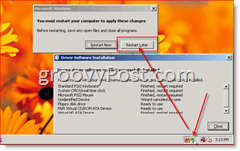
10: When Prompted to Reboot, Click Restart Later as shown below
Note – In the below screen shot I first double clicked on the Software Install Icon on the toolbar to review all the software which was installed.
Before we restart the computer, we need to take care of some legacy housekeeping from the legacy Virtual Server 2005 environment.
NOTE:
- Windows Vista Migration: Skip Step 11 if you have already uninstalled the VM Additions and go directly to Step 12.
- Windows Server 2003 Migration: Skip Step 11 if you have already uninstalled the VM additions and go directly to Step 15.
11: The first task is to Uninstall the Legacy Virtual Machine Additions:
Once those are uninstalled (Don’t reboot the box), we MUST UPDATE THE HAL on the box. Fortunately, this is easy on Vista (and automatic for Windows Server 2003). Just follow the steps below for Vista OR Windows Server 2003.
- Windows Server 2003 Migration: Skip Steps 12-14 and go directly to Step 15
- Vista Migration: If you don’t update the HAL, your network card will be dead. Most of the hardware drivers in Hyper-V will not work until the HAL is updated!
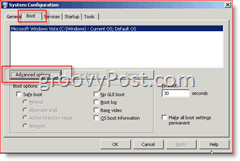
12: Click the Start Button and Type msconfig, Click msconfig.exe under Programs


13: Click Boot Tab, Advanced options
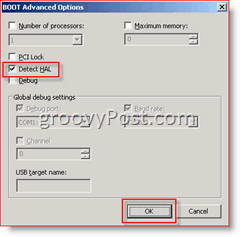
14: Check box Detect Hal, Click OK a few times to save
NOW, go ahead and restart the Guest VM when prompted. Wow… this is a long article BUT, were almost done.
It’s now time to install the new Hyper-V Virtual Machine Additions (however Microsoft changed the name again on us) called: Integration Services.
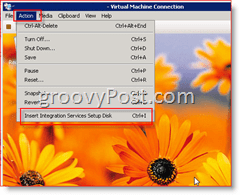
15: Console into the Guest System and Click Action, Insert Integration Services Setup Disk
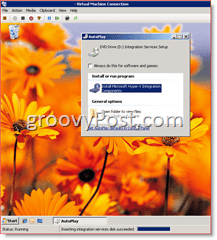
16: Run Install Microsoft Hyper-V Integration Components
- Vista Migration: Complete Step 17 and move on to Step 18.
- Windows Server 2003 Migration: Skip Step 17 and move to Step 17a
17: The Install should run for several minutes. When finished, Click Yes to reboot the VM. Now go directly to Step 18.


Windows Server 2003 Migration:
17a: When you launch the Microsoft Hyper-V Integration Components on a Windows Server 2003 SP2 guest VM, you will get a warning that you need to upgrade the HAL first. Click OK
17b: Once the HAL is upgraded you will be prompted to reboot. Click Yes to reboot
17c: After the reboot, Windows Server 2003 will continue to the Hyper-V Integration Components install and then prompt you to reboot again:
18: On my box, the reboot took a few minutes and once it came back up it took another 3-5 minute to fully boot and install more software (Vista only. Windows Server 2003 came up golden after 17c)


Once I logged in, I saw a few install balloons pop (Hyper-V Heartbeat Enabled/Detected) and then it asked me to reboot. Once you come back up, however, you should be good to go! The network should now be working and Mouse as well (even if you RDP into the VM Host and opening a Console connection to the VM).
So….. if you make it this far, congrats!!! You should have a brand new bouncing BABY VISTA or WINDOWS SERVER HYPER-V VM on Server 2008!
We covered a lot of ground here <phew>. Let me know if something didn’t work or if you’re still having problems with the migration. Feel free to leave a comment here or in the forum. I just created a new area for Hyper-V.
28 Comments



JessJames
April 24, 2008 at 10:27 am
Thank you so much!! I have been searching everywhere for a fix for why my network card would net enable. Step 14 fixed everything for me!
Thanks again!
John Gilham
April 24, 2008 at 10:14 pm
Great write up MrGroove!
MrGroove
April 25, 2008 at 7:41 am
Welcome to the site John!
Thanks for the comments! Hopefully it will help a few people avoid the problems I ran into during my first migration!
FarnsW
April 26, 2008 at 7:35 pm
Exactly what I was looking for. You just saved me a bunch of time groovy dude.
BTW – I’m glad I found your site. Just subscribed! Keep up the great articles. Would be good to see more on Hyper-V and server 2008
Efi Lami
May 15, 2008 at 7:40 am
Hi
First of all thank you for this great post it is very helpful.
It seems like i have a little problem implementing step 14 on a virtual machine running
windows server 2003.
when openning “msconfig” and clicking the advanced button in the boot tab there is no
Detect Hal option to select.
Is there any other way performing HAL detection in windows server 2003?
Thank you in advance for your great help.
Efi
Alis
May 15, 2008 at 10:49 pm
Hi,
In my case Step 14 was not needed when i upgraded on a server 2003 VM, Integration services took care of the HAL in step 15 “integration Services”.
Another thing with server 2003 was that i had to uninstall the Virtual Machine Additions before i moved the .vhd “step 11”.
1. Depending on hardware: “Make sure Hardware Virtualization and DEP is Enabled on the processor in the BIOS settings.
2. Uninstall Virtual Machine Additions when still on Microsoft Virtual Server.
3. Move the .VHD.
4. Create the new Virtual MAchine in Hyper-v and connect the existing .VHD.
5. Make sure you have at least server 2003 SP2 installed.
6. Install Integration Services.
/Alis
JDT
May 16, 2008 at 12:01 am
I am doing everything you have suggested, but get an error on every one of the VHD files I try to add from Virtual Server 2005 R2 SP1 to Server 2008 Hyper-V. They are all Server 2003 R2 Standard with SP2. It tells me “The file or directory is corrupted and unreadable”. Yet when I create an new empty VHD on VS 2005 and inspect it on Hyper-V it works, or if I use a VHD from VS 2005 that is a second drive to a installed virtual Machine, thus no OS installed, just data, it works.
MrGroove
May 18, 2008 at 1:37 am
@Efi – Alis is correct. You can skip the HAL update for Windows Server 2003 Migrations being that the “Hyper-V Integration Services” install was take care of the HAL update for you.
Originally this article only outlined the process for a VISTA migration but, being that more an more people are sending me emails and asking questions here regarding a Server 2003 move to Hyper-V, I have updated the article to reflect both a Vista and Windows Server 2003 migration.
Thanks!
-MrGroove
MrGroove
May 18, 2008 at 1:39 am
@Alis – Welcome to the site and, “Thank You” for taking the time to answering Efi’s Question and posting a great comment to the site.
Thanks,
-MrGroove
MrGroove
May 18, 2008 at 1:45 am
@JDT – That is a very strange problem your running into. This comment area is not the best for troubleshooting so please open up a new discussion in the forum and we can begin troubleshooting your issue.
Thanks! We will get this fixed for you!
Max Trinidad
May 22, 2008 at 9:16 am
Thanks… Great content! I’m in process of migrating some VS2005R2 VM’s and I was looking for this information. By the way, I just notice, on Windows Server 2008 Automatic Updates, the KB949219 fix is listed as an “Optional” to install. This will save the time if ypou look at your windows updates first.
Good Job!
Max Trinidad
May 22, 2008 at 10:37 am
OK… In the scenarion of having an environment with both VS2005R2 and Hyper-V VM”s. in the case that something happen to the Hyper-V server, can I still be able to run the VM under VS2005R2?? What’s your opinion?
MrGroove
May 23, 2008 at 3:24 pm
@Max Trinidad – Welcome to the site!
From what I’ve read, before you can migrate guest systems from the Hyper-V server back to your VS2005R2 box you will need to uninstall the Virtual Additions or Integration Services as they are now known as in Hyper-V.
I’ve not actually attempted this so let me know if you try it out. If I have time to try it, I’ll write an article here on it.
Efi Lami
May 29, 2008 at 12:33 am
Hi
After performing the migration proccess by taking the steps Alis specified
The migration proccess of windows server 2003 guest machines succeeded.
Thank You Alis/MrGroove !!!
pc4life
July 16, 2008 at 12:49 pm
great technology and a great read (a bit long tho). hyper-v is going to mop up vmware so i’m glad your covering it.
love the screen shots
noname
July 25, 2008 at 1:01 am
Dont Forget about NIC cards, since Hyper-V is using different NIC, you will need to delete hidden not present NIC, before moving your IP to new network card!
MrGroove
July 28, 2008 at 9:38 pm
@Efi Lami – Your Welcome! I’m glad it worked out for you!
MrGroove
July 28, 2008 at 9:51 pm
@pc4Life – Never know…. VMWare just answered (today in fact) with their own FREE VMWare Server Hyper-Visor called ESXi – http://www.vmware.com/products/esxi/. Will need to download that.
MrGroove
July 28, 2008 at 9:52 pm
@Noname – Thanks for the comment and yes. My recommendation would be to take a screen shot or write down the NIC settings before you migrate the VM from the original Virtual HOST to the new Hyper-V host. That way you can just delete uninstall and delete the NIC prior to migration.
imran
July 29, 2008 at 1:39 am
sf
Chuck vdL
August 4, 2008 at 11:34 am
Just a note that when migrating a Server2008 virtual machine from Virtual-PC 7 (on vista) to Hyper-v on 2008 server, (without benefit of these instructions) I ran into some issues where
* the new network card was not seen,
* 2nd processor (allocated to the VM) was not seen
* the Integration bits would go through the motion of installing, but never fully install
* Integration services installation gave a message that it detected a existing installation of the integration services (happens on initial attempt to install them, and subsequent attempts)
I had removed the VM additions, optimized the drive, etc, shut down the system and moved the VHD to the new 2008 Hyper-V server. Fired up a new VM (using pretty much the steps above) and after it did all it’s hardware detection, had tried to install Integration services. But then got stuck with the issues bulletted above.
Doing steps 12-14, and forcing it to re-detect the HAL took care of all of the above after the reboot.
So if you are migrating a 2008 VM, try following the instructions above for Vista and it should work well for you.
MrGroove
August 4, 2008 at 12:35 pm
@Chuck – Thanks for the detailed comment. I’ve not tried to migrate a Server 2008 so I appreciate the testing and FYI.
Thanks, and welcome to the site!
Chuck vdL
August 4, 2008 at 2:53 pm
One other tip is this. If you are remoting to your hyper-v server (for example if it’s in a server room) it’s a major PITA to setup a new VM over remote desktop because you won’t have access to the mouse etc untill the integration services are installed on the VM. And doing all the things you might need to do in order to get to that point, solely via the keyboard is just a wee bit tricky.. and even trickier in a remote desktop window where a lot of the shortcuts are different.
The trick to doing this my friends is to realize that the Hyper-V Manager can be run remotely! It will run on any VISTA sp1, or 2008 system. So what you can do is use remote desktop as needed to move files around etc, but then when it comes time to create the new virtual machine, close down remote desktop (or better yet logout of the remote session) and run Hyper-V Manager on your local box, connecting it to the Hyper-V server. You now have exactly the same control you would if using Hyper-V Manager locally on the virtualization server. So, this means that when you intially connect to the new VM, because you are not in a remote desktop session, you WILL have mouse controll and will be able to much easier take care of any configuration changes (like a HAL detection reboot) that are needed before you install the integration services.
MrGroove
August 5, 2008 at 8:44 am
@Chuck – Great Tip! And, perfect timing! I just wrote 2 articles on this very subject – How-To Connect to and Manage a Hyper-V Server Remotely using Vista or from a Windows 2008 Server
Matthijs
September 17, 2008 at 10:47 pm
Good description of the migration process. However, the physical properties of the Virtual PC / Virtual Server VM can now easily be imported. See blog post.
http://blogs.technet.com/matthts/archive/2008/09/12/vmc-to-hyper-v-import-tool-available.aspx
RonC
October 22, 2008 at 2:18 pm
Have you had any luch with uninstalling virtual machine additions from Windows Server 2008? I cannot for the life of me get it to work and therefore cannot migrate to Hyper-V.
Any suggestions?
MrGroove
October 22, 2008 at 2:51 pm
@Matthijs – Thanks for the FYI. I’ve not had a chance to try your new app. I’ll give it a shot and let ya know how it goes.
@RonC – Actually yes. I have done it before. The first time I migrated a machine from Virtual Server 2005, I booted up the guest system in the Hyper-V environment and had to use the keyboard (mouse doesnt work well nor does RDP until you have the new Hyper-V Guest Apps installed) at the HOST system (Console) to navigate through the guest and uninstall the old VM Additions.
If you need help, please start up a new Topic in our Forum – https://www.groovypost.com/forum/ There you can post screenshots and we won’t make the comments here ALL messy. Registration takes just 2 minutes and it’s a simple forum to navigate.
Thnx,
-MrGroove
MrGroove
November 25, 2008 at 1:34 pm
Comments Closed for this Tutorial.
Please post all further Questions or Comments in our Free Tech Support Community Forum
Thanks,
-MrGroove