How to Curve Text in Word

If you want to customize text in Word, you might want to try curving the text using WordArt. Here’s how.
A typical Word document has a standard layout, where the text itself is the most essential element, regardless of the formatting. Of course, if you want to create more varied types of documents, you can format the text by changing fonts or by changing the layout with text indents and more.
If you want some of your text to stand out against the rest, however, you may want to add special effects. WordArt is one way to do this, allowing you to curve some of your text in Word. If you want to know how to curve text in Word, here’s what you’ll need to do.
Adding Curves to Text in Word
There are a couple of ways you can add curves to text in Word. The first method is too add a preset curved effect to your text, with various curving effects that follow different paths. These effects curve the text upwards, downwards, or create a circle-like effect.
To add curved text to a Word document, open your document and press the Insert tab on the ribbon bar. From there, press the Wordart option, listed under the Text category.

From the WordArt drop-down menu, select the style of WordArt text you wish to use.

Clicking any of the available effects will insert a text box into your document using that WordArt effect. You’ll need to replace the placeholder text with your own at this point.
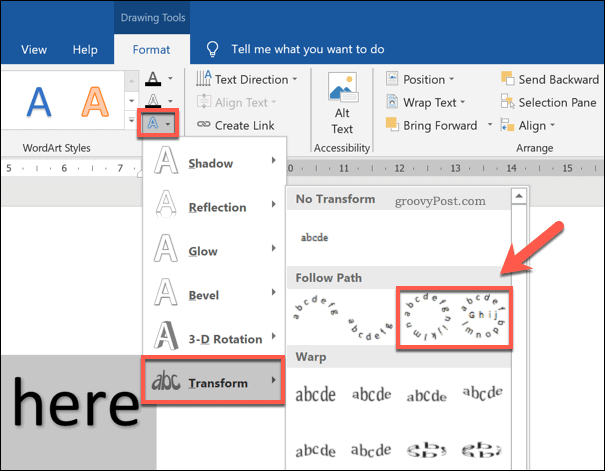
Once you’ve replaced the placeholder text, you’ll need to set WordArt to use a curve. To do this, and with the text box active, press the Drawing Tools – Format tab on the ribbon bar.
From there, press the Text Effects button, listed under the WordArt Styles category.

From the WordArt Styles drop-down menu, click Transform to view various curved styles to apply.
In the Follow Path section, you can select an effect that will curve the text upwards, downwards, or to create a full circle. Select one of these effects to apply it to your WordArt text box.
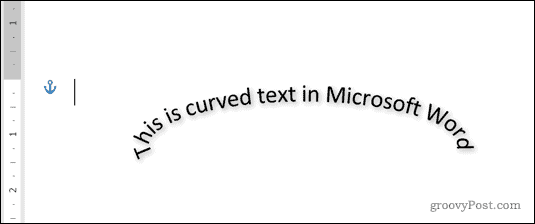
With the WordArt text box style changed, the effect will become visible in the document.
If you want to increase or decrease the curvature of the text, however, you’ll need to first select the text box. With the text box selected, use your mouse or trackpad to move the orange dot icon.
As you move the icon, a trace line showing the future shape of the curve will become visible. The visible shape will depend on the text effect you selected.

Once you’re happy with the curve, release your mouse cursor. This will drop the text into the new position.
Curving Text to a Custom Shape in Word
Using the WordArt text effect, you can curve text using a preset shape and design. If you want, however, you can wrap WordArt text around a custom shape.
If the shape is invisible (or has the same background as your document background), you can wrap the text without the shape of the curve being visible. This allows you to curve text in Word using various custom shapes and designs.
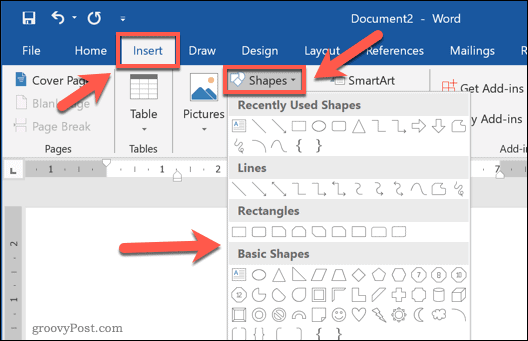
To do this, insert a new WordArt text box by pressing Insert > WordArt.
Replace the placeholder text in the WordArt text box with your own. With the text box inserted and the placeholder text changed, select the text box, then press Drawing Tools – Format > Text Effects.
From the drop-down menu, press Transform, then select Circle from the options provided.

With the circular text effect added to the WordArt text box, you’ll need to wrap the WordArt text around a new shape.
To insert a new shape, press Insert > Shapes and select a shape from the drop-down menu. Shapes with rounded edges are best here, as the path of the WordArt text can be changed to follow the shape.
With the shape inserted, select the text box and resize it so that the text surrounds the outside path of the shape. Press the orange dot icon and reshape the WordArt path to surround the outside shape edge.
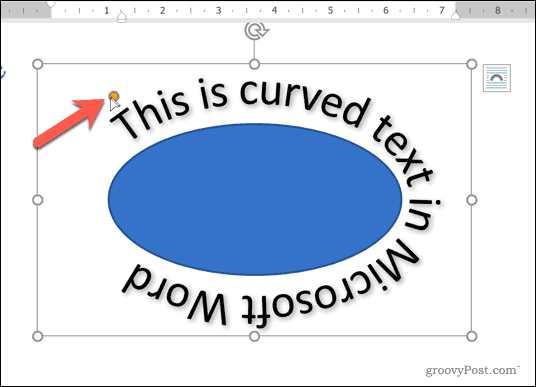
Release your mouse cursor once the WordArt path surrounds the shape as a whole.

If you want to wrap text around shapes with harder edges (for instance, a square or rectangle), you’ll need to create multiple WordArt text boxes.
Once inserted, you’ll then need to position them on each side of the shape manually. You may need to rotate the text boxes to ensure that the text is positioned correctly on each side of the shape.

Removing Curves From Text in Word
If you want to remove a curved text effect from a WordArt text box in Microsoft Word, the process is easy.
To start, select the WordArt text box in your document. From the ribbon bar, press Drawing Tools – Format > Text Effects. From the drop-down menu, select Transform > No Transform.
This will disable any curved text effects and return your WordArt text to normal.

With the text effect removed, the WordArt text will appear horizontally. You may need to take additional steps (for example, removing a shape) to restore your document layout.
Other Word Formatting Options
Curving text in Word using WordArt is just one potential way to add custom formatting to your document. It’s great for emphasis, but it isn’t something you can add to every document, with WordArt better suited to documents like flyers.
There are other types of formatting you can try, however. For instance, you can find and replace formatting in Word to quickly customize your document, or change the default font for consistent text formatting across different files. You may even decide to draw in Microsoft Word, allowing you to add diagrams and basic drawings to your documents.