How to Enable a Dynamic Refresh Rate on Windows 11

A high monitor refresh rate might look good, but on a laptop, it can soon drain your battery. Here’s how to enable a dynamic refresh rate on Windows 11 to help stop that problem.
If your laptop display has a high refresh rate, you’ll see smoother motion when anything on-screen changes. However, this will come at the cost of reduced battery life. Wouldn’t it be great if there was a way to use a higher refresh rate only when you really needed it?
The good news is you can enable dynamic refresh rate on Windows 11 to do exactly that. If you have the right hardware, you can let Windows 11 decide when you would benefit from a higher refresh rate, and when it’s better to turn the refresh rate down to save battery.
We’ll explain how to enable a dynamic refresh rate on Windows 11 using the steps below.
What is Dynamic Refresh Rate?
Refresh rate is a measure of how quickly your screen refreshes. A 60 Hz refresh rate, for example, means that the image on your computer will update sixty times every second. The higher the refresh rate, the smoother any on-screen motion will appear on your screen.
For many tasks, a high refresh rate isn’t really necessary. If you’re scrolling through your email, for example, you’re not really going to notice a huge difference between a 60 Hz refresh rate and a 120 Hz refresh rate. However, if you’re playing a video game with high-definition graphics and a lot of motion, a higher refresh rate can make your game look a lot smoother.
The trouble is, a higher refresh rate means your display is working harder, and this means it uses more power. A higher refresh rate inevitably leads to shorter battery life. That’s where a dynamic refresh rate comes in. Enabling this setting allows Windows 11 to take control of your display’s refresh rate.
Let’s say you’re working on a Word document—Windows 11 will keep your refresh rate at a battery-friendly 60 Hz. When you’re gaming, it will automatically switch to a 120 Hz refresh rate to compensate for the quicker on-screen motion.
By only using a higher refresh rate when it’s really needed, you can grab more life out of your laptop battery.
How to Enable Dynamic Refresh Rate on Windows 11
Turning on the dynamic refresh rate allows Windows 11 to vary your refresh rate for the task or application you’re using to improve battery life. You’ll need to change your refresh rate on Windows 11 to do this.
A dynamic refresh rate is only available for laptops with a display that supports a variable refresh rate (VRR) and has a maximum refresh rate of at least 120Hz. If your hardware doesn’t meet the criteria, you won’t see any option to enable a dynamic refresh rate.
To enable dynamic refresh rate on Windows 11:
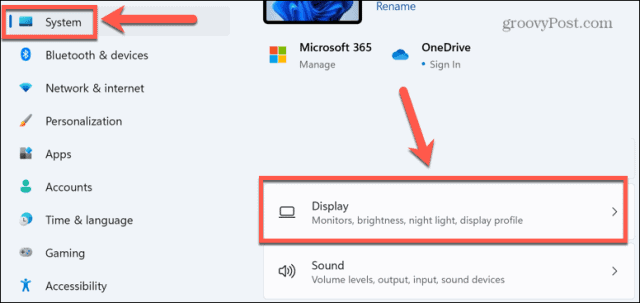
- Open Settings by right-clicking the Start menu and selecting Settings.
- In the System menu, click Display.


- Scroll down and select Advanced Display under Related Settings.


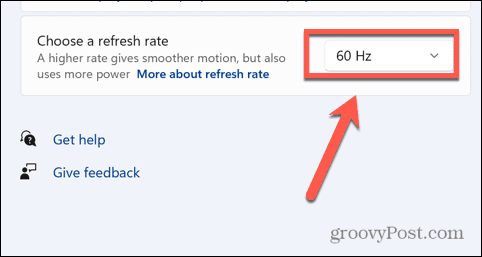
- Click the drop-down box next to Choose a Refresh Rate.


- If the option is available, select Dynamic. The available refresh rates for your monitor will also be shown.


Why Can’t I Select Dynamic Refresh Rate?
As mentioned above, dynamic refresh rate will only work for laptops that can offer a minimum of 120 Hz refresh rate. If your display meets these criteria, but you still don’t see the option to select dynamic refresh rate, then the problem is probably your driver.
Your display must be running the WDDM 3.0 graphics driver for a dynamic refresh rate option to appear. You can check your driver model to see whether your current graphics card supports a dynamic refresh rate.
To check your driver model on Windows 11:
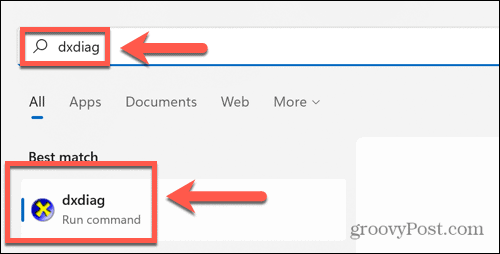
- Click the Search icon in the taskbar or open the Start menu.


- Type dxdiag and click the Best match option that appears in the results.


- In the DirectX Diagnostic Tool window, select the Display tab.


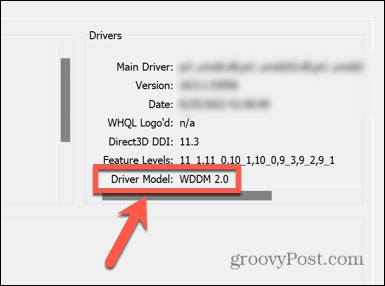
- Under Drivers, check the Driver Model.


- If the Driver Model isn’t set to WDDM 3.0 or higher, you won’t be able to use a dynamic refresh rate.
Getting to Know Windows 11
If you decide to enable a dynamic refresh rate on Windows 11, you can help to extend your battery life in high-power applications and games. There are plenty of other tweaks you can make in Windows 11 to make your experience better for your circumstances, however.
For example, you can disable Superfetch on Windows 11 to try to solve high disk usage issues. You can use the Windows 11 Performance Monitor to troubleshoot issues. You may also want to disable automatic driver installation on Windows 11 to stop updated drivers from causing issues.
Leave a Reply
Leave a Reply
