Use Dropbox More Effectively With These 10 Tips & Tricks

Aside from the basics of using Dropbox, how can you use Dropbox more effectively to maximize your use out of the service?
The Internet has provided us with many new adjectives. To search for something is “to Google it.” Phoning someone is “to Skype them.” To message someone is “to Slack them” or “App them” (as in WhatsApp). When it comes to sending a file via cloud storage, the adjective for that one belongs firmly to Dropbox with “I’ll Dropbox it.”
After all, “I’ll Google Drive you the file” doesn’t exactly have the same ring to it, does it?
Aside from the basics of using Dropbox (which has already been endlessly rehashed), what other things can you do to maximize your use out of the service? That’s today’s topic in groovyPost tech class.
Use Dropbox More Effectively With These 10 Tips & Tricks
OK, students, take notes.
Control What Is Synced Using “Selective Sync”
If you have many files inside the web version of your Dropbox account, you may not want all of it cluttering up your computer. Especially if you have limited space on your hard drive. Therefore if you have files that are not strictly needed right now on your computer, you can use something called Selective Sync.
This tells Dropbox to remove that certain folder from the computer but still keep it in the web version of Dropbox. If you have Dropbox installed on multiple computers, you can have different Selective Sync settings on each device, depending on your needs and hard drive space.
To use the feature, right-click on the Dropbox icon in your system tray and go to Preferences. Under the Sync tab is the Selective Sync option.
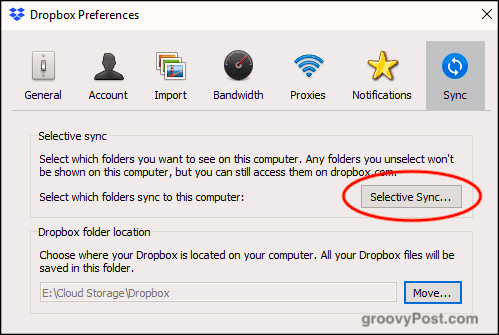
If you click the button, your Dropbox folders will show. Untick the folders you want to remove from the computer and click Update. Now watch the folder disappear from the computer.
Please note that you can only remove folders, not individual files. Therefore files you wish to have removed must go into a folder, and that folder removed. I generally have an “unsync” folder and throw all unneeded files into that.
For more, check out our step-by-step instructions on how to use Selective Sync.
Share & Comment On Files Using The Right-Click Menu

When you are in the Dropbox folder on your computer, right-clicking on a file brings up several Dropbox-related options: Share, Copy Dropbox link, View on Dropbox.com, Version History, and View Comments.
Clicking Share enables you to set a sharing link and enter the email address of the person you want to send the link to. Alternatively, you can click the option to copy the link to your clipboard. This way, you can send the link via text, chat, or whatever.
Send File Requests To Non-Dropbox Users
Although Dropbox has become synonymous with cloud storage, not everybody uses it. So what if you need a non-Dropbox user to upload something to your account? Instead of kidnapping their entire family and telling them to open a Dropbox account, they could use one of two services.

The first is Send To Dropbox, which creates a unique email address. You can then give the email address to people, and they can email the files to you, which will then appear in your account.
The second possibility is JotForm which has a feature where you can set up and embed a file upload box on your website. I would be hesitant about using this because anyone can upload anything to your Dropbox, including virus-infected files. At least with “Send To Dropbox,” you can be cautious about who you give the email address.
Connect Your Dropbox Account To (Legal) eBook Download Websites

Legal download websites, like Project Gutenberg, now allow you to link to your cloud storage account. That way, when you want to download a book, it can be sent directly to your account on Dropbox, Google Drive, or OneDrive.
Choose the book you want, and you will see the cloud storage icons on the right-hand side. Choose your preferred service, and you will be asked to authorize the site to access your Dropbox account.
Add “Dropbox For Gmail” To Integrate Your Files Into An Email

As file sizes for email attachments are still restricted to around 25MB, one way around it is to put the file into cloud storage and link to it inside the email. Then the recipient merely has to click on the cloud storage link to download the file.
Enter Dropbox For Gmail. To get this free Gmail add-on, click the “+” button in the right-hand sidebar of the new Gmail. When the Google Apps Suite box comes up, search for Dropbox. A couple of clicks later, it will be added. Now refresh your Gmail page to see it up and running.

Now, when composing an email to someone, you will see a small Dropbox icon among the options. Clicking that gets you into your files. Choose which one you want to send, and you’re off to the races.
Enable Screenshot Sharing In Dropbox
I don’t really use this much since I already have my trusty go-to screenshot app – SnagIt. However, some of you may like to use the screenshot-sharing function in Dropbox.
It doesn’t make screenshots, however. It only puts your screenshots into a Dropbox folder and automatically makes Dropbox sharing links so others can download them.
In the Dropbox settings is the option for sharing screenshots.

Now when you take a screenshot (say with CMD + SHIFT + 4 on your macOS), the screenshot will go into a “screenshots” folder in your Dropbox. A sharing link will then be automatically generated and copied to your clipboard.

Move The Default Location Of The Dropbox Folder On Your Computer

Remember at the start when I told you about Selective Sync? Well, under that same Sync tab is the default location of the Dropbox folder on your computer.
Generally, Windows and macOS put the Dropbox folder in a really stupid inconvenient place. Whereas I like to have a Cloud Storage folder on the computer, and in there have the default folders for Dropbox, Google Drive, Sync, etc. It annoys me no end that OneDrive can’t be moved.
If you want to easily move your Dropbox folder to another place on your computer, click the Move button under Dropbox folder location. Choose your new location, and the folder will move over along with all of the folder’s contents.
Change The Default “Save” Location To Dropbox

In places like your computer settings and browser settings, you are asked to specify a default location for saving files. I have a “Downloads” folder where everything gets thrown into, but why not specify a Dropbox folder instead? That way, everything you download will get synced across computers.
The only downside to this is making sure you have enough Dropbox space if you are in the habit of downloading big files….ahem.
Secure Dropbox Files With BoxCryptor

One of the downsides of cloud storage is that (as yet) they do not offer encryption. The one exception is Sync, which I also use and which is great. But Dropbox doesn’t offer any file encryption.
Until they do, a good alternative is BoxCryptor. With a limited free version and two paid versions, BoxCryptor makes a virtual drive on your computer, becoming your new Dropbox folder. When you drag a file into the folder, you can specify whether it should be encrypted before it is sent to the Dropbox server.
Store Audio Recordings In Your Dropbox Folder Automatically

If you are the kind of person that likes to put down your thoughts on audio, then this is one for you. RecUp (for iOS) and Smart Recorder (for Android) are two apps that automatically upload recordings to your Dropbox folder when you have finished recording.
Again, make sure you have enough Dropbox space for all those MP3 files that will start to stack up.
Conclusion
As you can see, there are lots of cool things you can do with Dropbox. Even if you don’t use all of these tips, learning a few tricks can make Dropbox even more useful than it already is.